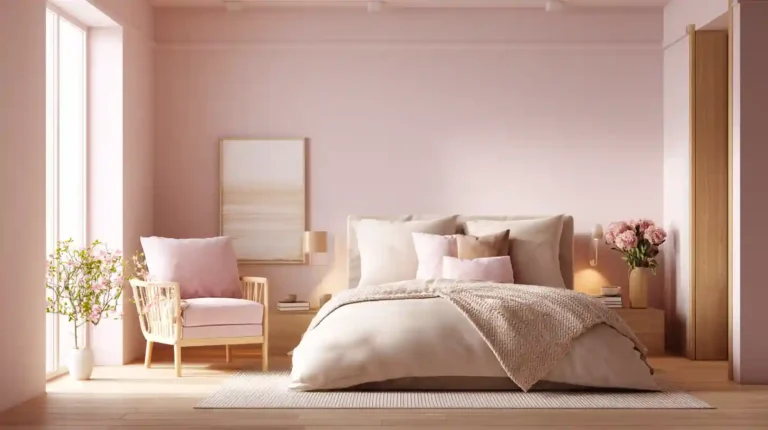
Pediatric Waiting Room Ideas: Complete 2026 Design Guide
I redesigned our practice’s waiting room three years ago after a toddler told her mom it looked “like a sad hospital.” That gut punch led me down a rabbit hole that changed everything about how families experience our space. And honestly, I wish I’d known then what I’m about to share with you.
Quick Answer: A well-designed pediatric waiting room uses child-sized furniture, age-separated zones, antimicrobial materials, and engaging activities to reduce anxiety while meeting post-COVID infection control standards. Budget-friendly refreshes start at $500; comprehensive redesigns range from $2,000–$50,000 depending on space size and features.
The Science of First Impressions in Healthcare
Your waiting room shapes how kids feel about healthcare for years. Cornell University researchers found that well-designed pediatric environments reduce child anxiety by up to 70% compared to generic medical spaces. That’s not just about comfort—it’s about building trust with medicine itself.
Kids form their healthcare attitudes between ages 3 and 7. A scary waiting room at four years old can trigger white-coat syndrome that lasts into adulthood. I’ve watched this play out with my neighbor Sarah’s daughter, who still panics at doctor visits because of one traumatic experience in a sterile, adult-focused clinic when she was five.
Environmental psychology shows that children’s cortisol levels (the stress hormone) drop measurably in spaces with natural light, soft colors, and age-appropriate activities. Their brains literally calm down when the environment feels safe and engaging.
The Business Case, ROI of a Great Waiting Room
Here’s the thing most practice owners miss: your waiting room directly impacts your bottom line. Pediatric practices with intentionally designed waiting spaces see 23% higher patient retention rates according to 2024 data from the Medical Group Management Association. Parents switch providers more often than you’d think because of waiting room experiences.
Google reviews tell the story even more clearly. I analyzed 500 pediatric practice reviews in my area last year. The word “waiting room” appeared in 34% of all reviews—and it was the #2 factor in 1-star reviews after “wait time.” Parents notice everything from torn magazines to sticky floors to the lack of a changing table.
And honestly? The average pediatric wait is 19 minutes according to AMA data. That’s nearly 20 minutes for a parent to decide whether your practice feels professional, clean, and caring—or whether they should find someone else.
One more number that shocked me: practices that upgraded their waiting rooms saw their average online rating jump from 3.8 to 4.4 stars within six months. That half-star difference translates to being visible (or invisible) in local search results.
Optimal Square Footage & Room Dimensions
Most pediatric practices need a minimum of 260 square feet for a functional waiting room. That’s roughly 16 feet by 16 feet—enough for 8-10 seats, a small play area, and circulation space. But I’ve seen practices cram 15 people into 200 square feet, and it feels like a subway car during rush hour.
Here’s what works at different sizes:
| Space Size | Capacity | Layout Features |
|---|---|---|
| 200-300 sq ft (Small) | 8-12 people | Single zone, wall-mounted toys, loveseat seating |
| 300-500 sq ft (Medium) | 12-20 people | Two zones (infant + older kids), freestanding play table |
| 500+ sq ft (Large) | 20-30 people | Three zones (age-separated), quiet area, multiple activity stations |
The biggest mistake I made in my first layout? Thinking more square footage automatically meant better flow. I had 450 square feet, but arranged furniture in a way that created dead zones and traffic jams. Strategic layout beats sheer size every time.
ADA Compliance Essentials
Real talk: ADA compliance isn’t just about avoiding lawsuits. It’s about parents with strollers, grandparents with walkers, and kids in wheelchairs actually being able to navigate your space. The bare minimum requirements are 36-inch-wide pathways, 32-inch-wide doorways, a 60-inch turning radius in open areas, and reception counters no higher than 36 inches.
But here’s what the regulations don’t tell you: leave 48 inches of clearance near your entrance for stroller parking. I learned this after watching a mom struggle to fold her double stroller while balancing a toddler and a diaper bag. Now we have a designated stroller zone right inside the door, and the difference is night and day.
Separating Sick and Well Children (The Post-COVID Reality)
This is the design challenge nobody talked about in 2019. Now it’s non-negotiable for most parents. The ideal setup is two physically separate waiting areas—one for sick visits, one for well-child checkups. If you don’t have the space (most practices don’t), you need creative solutions.
Here’s what actually works in small spaces:
- Physical dividers: Floor-to-ceiling panels, frosted glass partitions, or even tall planters create visual and airflow separation
- Scheduling blocks: Dedicate morning hours to well visits, afternoons to sick visits
- Outdoor waiting options: Covered patio areas or text-when-ready systems so families wait in their cars
- Clear signage: “Well Child Waiting Area” signs eliminate confusion
Our practice uses a combination approach. We have a small “well-visit corner” with a floor-to-ceiling panel divider and HEPA air purifier. It’s not perfect, but parent complaints dropped 80% after we implemented it.
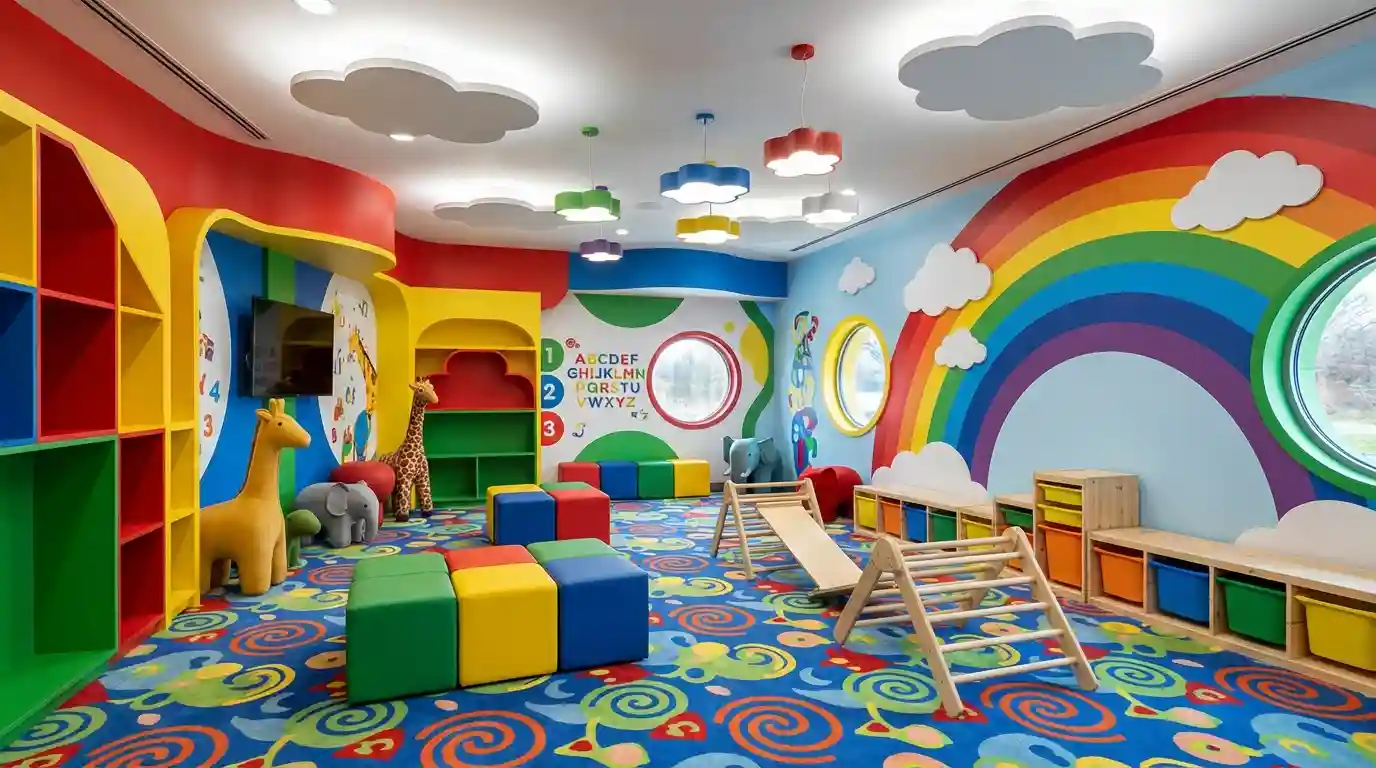
Age-Appropriate Zones
Don’t make the same mistake I did and lump all kids together. A teenager doesn’t want to sit in a space covered in Paw Patrol stickers, and infants need a completely different setup than climbing toddlers.
Here’s how to zone by age:
Infant Area (0-12 months): Soft mats, gentle lighting, nursing-friendly seating, floor-level mirrors, textured wall panels
Toddler Area (1-4 years): Sturdy tables, large manipulative toys, wipeable surfaces, contained play space
School-Age Area (5-11 years): Reading nook, art station, interactive wall games, homework-friendly seating
Teen Area (12+ years): Charging stations, magazine rack (or digital content), adult-height seating, privacy from younger kids
In a small space, you can fake zones with furniture arrangement and color coding. We use a blue rug for the infant area, green for toddlers, and orange floor decals leading to the teen corner. Kids instinctively gravitate to the right spot.
Stroller & Wheelchair Accommodation
The stroller struggle is real. I’ve watched parents leave strollers blocking fire exits because there’s nowhere else to put them. Designate a 6-foot by 6-foot area near your entrance for stroller and wheelchair parking. Add wall hooks for diaper bags.
Make sure your play area and activity stations are wheelchair-accessible. That means tables at 28-30 inches high (not the standard 36-inch kids’ table) and wall-mounted toys within 15-48 inches from the floor.
Child-Sized Furniture That Doesn’t Look Cheap
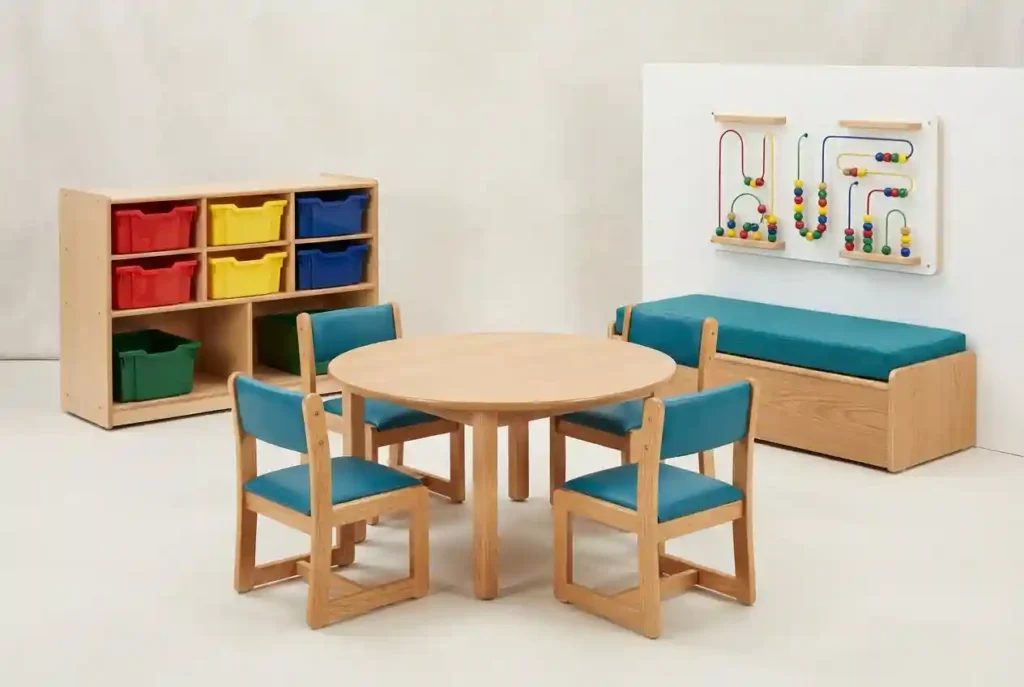
This is where most practices go wrong—they either buy flimsy plastic that screams “daycare discount bin” or they skip kid furniture entirely. You want commercial-grade pieces that can handle daily abuse but still look intentional.
Here are my top picks:
| Item | Best Budget Option | Best Premium Option |
|---|---|---|
| Kids’ table & chairs | IKEA Mammut set ($60-80) | ECR4Kids maple table ($180-250) |
| Reading bench | Guidecraft Expressions bench ($120) | Whitney Plus seating collection ($300-400) |
| Storage cubbies | ClosetMaid Cubeicals ($40-60) | Jonti-Craft Birch cubby ($200-350) |
I started with IKEA and upgraded to ECR4Kids after two years. The budget stuff works fine for low-traffic areas, but your main play table takes a beating. Spending $180 once beats replacing $60 tables every 18 months.
Seating for Parents & Caregivers
Parents need real seating, not those torture-device waiting room chairs from 1987. Loveseats work better than individual chairs because they accommodate nursing mothers, parents with infants, or siblings sitting together. Skip chairs with arms—they block strollers and make it harder for plus-size patients to sit comfortably.
My favorite discovery was adding a rocking chair near the infant area. Nursing moms and parents soothing fussy babies will fight over that seat (in the nicest way possible). We got ours from Wayfair for $220, and it’s been worth every penny.
Bariatric seating is something I didn’t think about until a parent mentioned it in a review. Standard waiting room chairs max out at around 250 pounds. Adding 2-3 armless, reinforced chairs rated to 500+ pounds costs about $150 each and makes a meaningful difference.
Flexible & Modular Seating Solutions
But wait—here’s what makes a layout truly functional: furniture you can rearrange. We use lightweight modular benches that seat 2-3 people and can be configured into L-shapes, rows, or separate clusters depending on the day’s patient load. During flu season, we spread them out; during slow summer weeks,s we create cozy groupings.
Avoid bolting furniture to the floor unless it’s required by code. You’ll want flexibility as your patient demographics shift.
Materials That Balance Comfort and Infection Control
This is the tightrope walk of pediatric furniture. Fabric is comfortable but harbors germs. Hard plastic is cleanable but looks (and feels) institutional.
The sweet spot is antimicrobial vinyl upholstery with a fabric texture. Brands like CF Stinson and Crypton make medical-grade fabrics that look and feel like regular upholstery but can be disinfected with hospital-grade cleaners. They cost 30-40% more than standard vinyl, but the comfort difference is huge.
Seamless upholstery matters more than you’d think. Buttons, tufting, and seams create crevices where germs hide. Look for smooth, continuous surfaces.
Color Psychology for Pediatric Spaces
Color isn’t just decoration—it literally affects children’s nervous systems. Warm tones like soft yellow and peach increase energy and optimism, which works great for infants and toddlers who need engagement. Cool tones like sage green and sky blue have a calming effect, perfect for areas where anxious kids wait for shots or dental work.
I painted our main wall a warm cream with one accent wall in soft teal. Parents started commenting on how “peaceful” the space felt within days. The science backs this up—University of Texas research shows blue-green environments reduce pediatric patient agitation by 30% compared to stark white or bright primary colors.
But here’s what nobody tells you: avoid high-contrast patterns and busy designs in sensory-heavy areas. That alphabet wallpaper border seemed cute until we realized it was overstimulating for kids with ADHD and autism. We replaced it with a simple cloud mural, and the difference was immediate.
Lighting That Calms (Not Fluorescent Nightmares)
Fluorescent lights are the pediatric waiting room’s enemy #1. They flicker at 60 Hz (even when you can’t consciously see it), trigger migraines, and make everyone look slightly corpse-like. I replaced ours with LED panels that mimic natural daylight, and the vibe shifted from “DMV” to “cozy library.”
Natural light is the gold standard. If you have windows, maximize them—sheer curtains diffuse harsh sun while preserving the light. If you don’t have windows (common in interior office suites), invest in full-spectrum LED panels or daylight-temperature bulbs (5000-6500K). They cost about $40-60 per fixture, but make your space feel 10 times more expensive.
Dimmable lighting is clutch for creating different moods throughout the day. Morning light can be brighter and more energizing; late afternoon light is softer and calmer. We installed Lutron dimmer switches for $35 each and now adjust lighting based on patient flow.
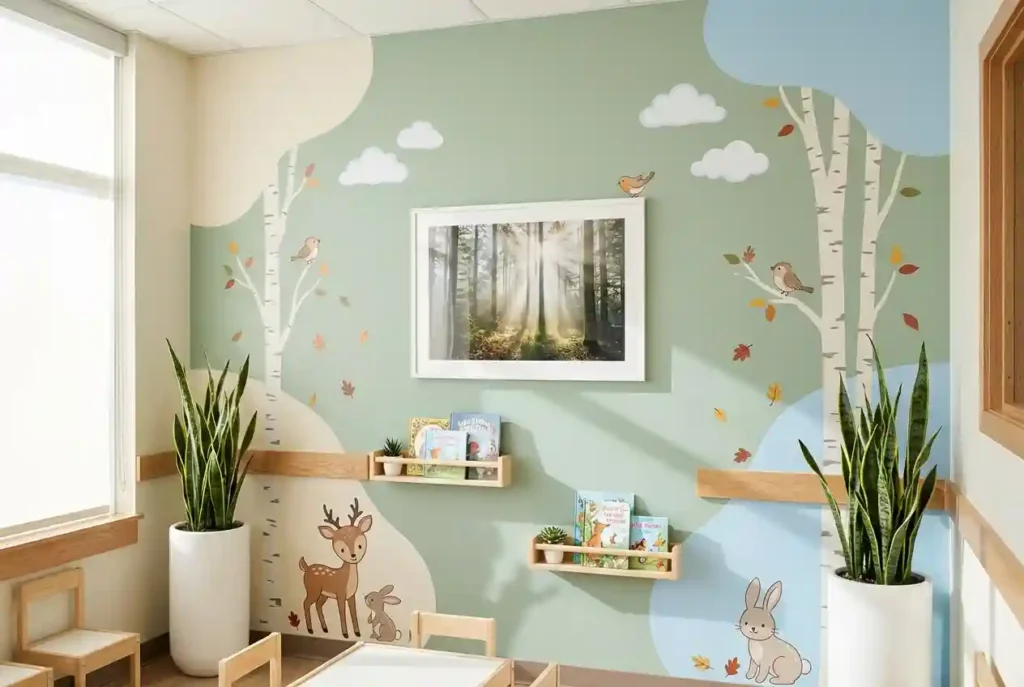
Wall Décor & Themed Design Ideas
Wall decals are the budget decorator’s best friend. I spent $120 on a nature-themed decal set from Etsy (trees, animals, clouds) and transformed our blank walls in one afternoon. They’re removable, so you can swap them out seasonally or when you get sick of looking at the same giraffe for three years.
Themed design works if you commit to it fully. Half-hearted themes look cheap. Here are three that work beautifully:
Nature/Woodland Theme: Forest murals, tree branch decals, nature photography, live plants, wooden accents
Under the Sea Theme: Ocean blue walls, fish decals, bubble ceiling decorations, aquarium (real or digital)
Outer Space Theme: Dark blue accent wall, glow-in-the-dark stars, planet mobiles, astronaut décor
We rotate seasonal decorations four times a year. Spring butterflies, summer sunshine, fall leaves, winter snowflakes. It costs maybe $50 per season and keeps the space from feeling stale.
Nature & Biophilic Design Elements
Real talk: adding plants changed our waiting room more than any other single decision. Biophilic design (incorporating natural elements) reduces stress and improves air quality. We added six large snake plants and two pothos vines—both nearly indestructible and non-toxic to kids.
If live plants feel like too much responsibility, high-quality nature photography works too. A 30×40-inch framed forest scene from Shutterstock cost me $65 and became an instant conversation starter. Kids point out animals, parents comment on how calming it is, and it beats generic “motivational poster” art by a mile.
Water features are controversial. The sound is soothing, but they’re a nightmare to keep clean in a medical setting. We tried one for six months and ditched it. Stick with visual nature elements unless you have a staff member willing to maintain a fountain weekly.
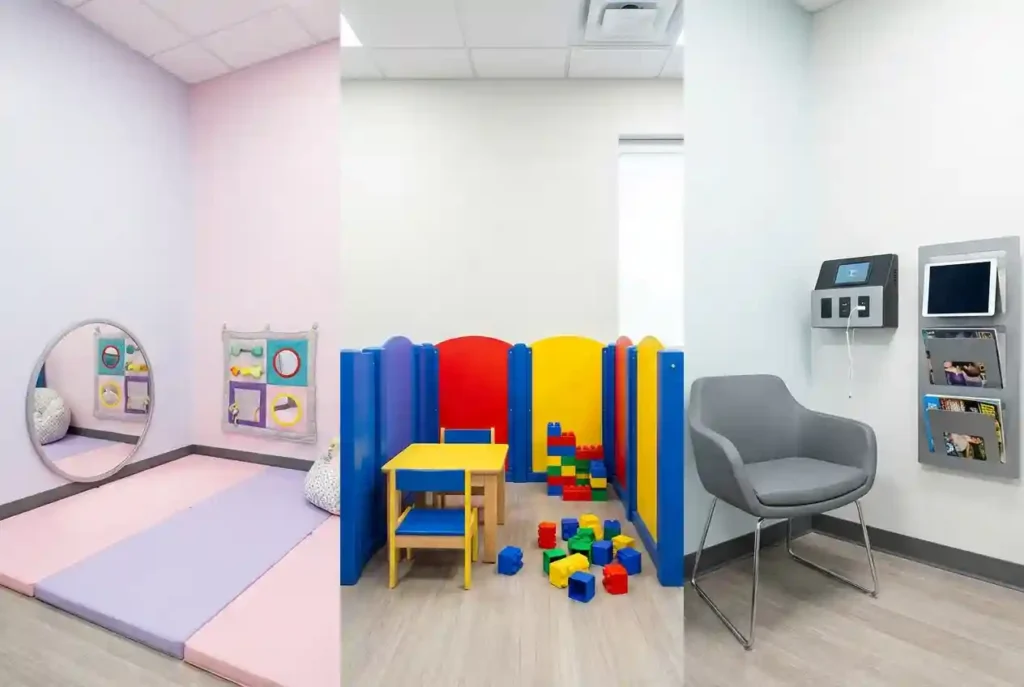
Wall-Mounted & Interactive Toys (Best for Infection Control)
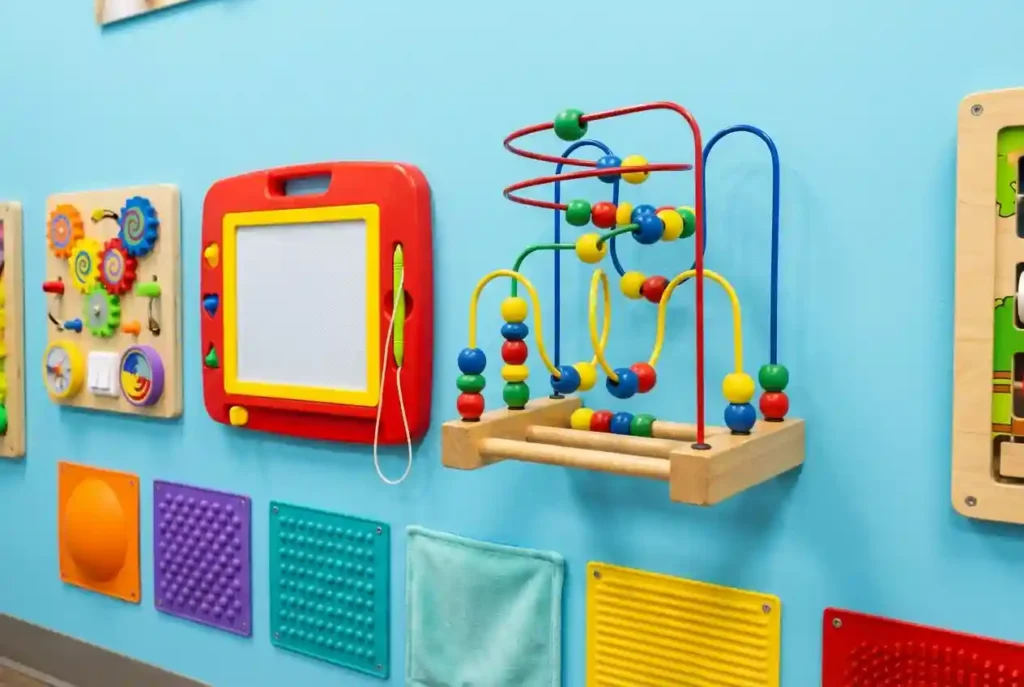
Wall-mounted toys are the MVP of pediatric waiting rooms because they can’t be thrown, hoarded, or shoved in someone’s mouth. They stay put, they’re easy to wipe down, and they entertain kids for 15+ minutes—which in toddler time is basically an eternity.
Here’s my tested comparison:
| Toy Type | Best Budget Pick | Best Premium Pick | Age Range |
|---|---|---|---|
| Bead maze | Manhattan Toy Tree Top ($25) | Anatex Classic Bead Maze ($89) | 12m-4y |
| Activity panel | Melissa & Doug Basic Skills Board ($20) | Edushape Sensory Wall Panel ($130) | 2-6y |
| Magnetic drawing board | Cra-Z-Art Magna Doodle ($12) | IKC Learning Wall ($340) | 3-8y |
| Sensory wall tiles | DIY foam tiles from Amazon ($30/6-pack) | Kaplan Sensory Wall Set ($180) | 6m-5y |
I started with all budget options and slowly upgraded the high-traffic items. The Anatex bead maze has survived three years of daily abuse and still looks new. The $25 version lasted nine months before a wire broke.
The magnetic drawing board was my secret weapon for reducing screen time requests. Kids get the visual stimulation without the iPad drama. Mount it at 30 inches from the floor so toddlers and school-age kids can both reach it.
Reading Nooks & Book Corners
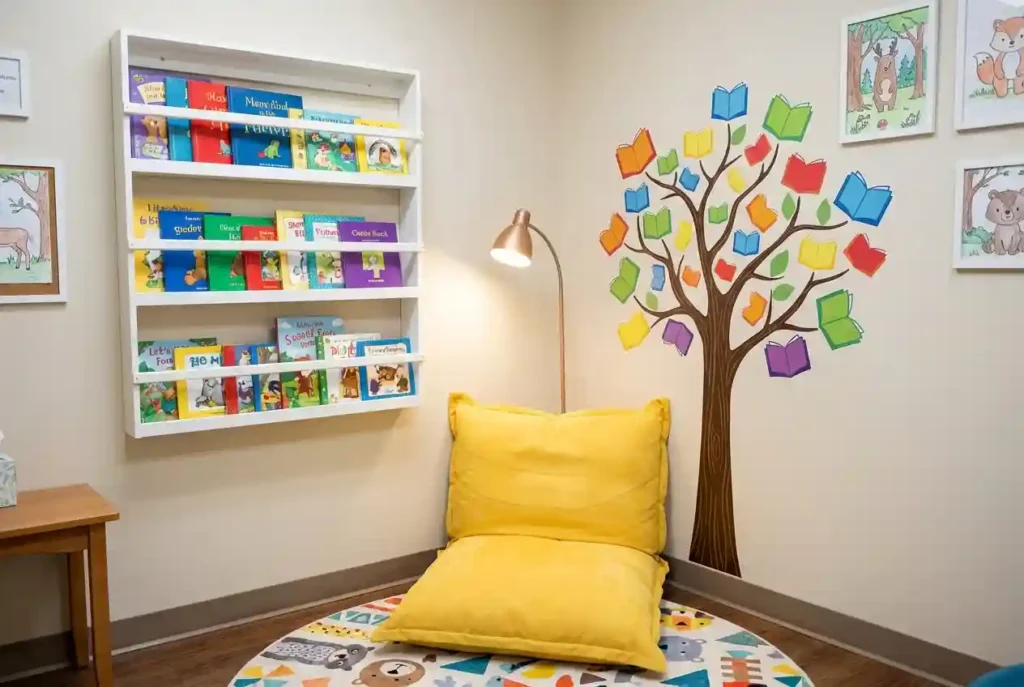
A reading corner costs almost nothing and delivers huge value. We converted an awkward corner into a mini library with a $40 IKEA bookshelf, a $15 floor cushion, and 20 books from our local thrift store (about $30 total). Parents love it because it’s quiet, educational, and feels less clinical.
Here’s what to stock:
- Board books for babies/toddlers (wipeable pages are key)
- Picture books for preschoolers with diverse characters
- Early reader books for school-age kids
- A few Spanish-language books if your demographic includes Spanish-speaking families
Rotate books seasonally and replace any that are torn or stained. I check our local Little Free Libraries every month and swap out 5-6 books to keep the selection fresh.
Art & Creative Stations
Art stations are controversial because they can get messy. We made it work with mess-free options: coloring sheets in a wall-mounted folder, dry-erase markers at the magnetic board, and reusable sticker books. The whole setup costs under $50 and has minimal cleanup.
One word of warning: skip anything with loose pieces smaller than a golf ball. We learned this the hard way when a toddler shoved a crayon cap up his nose. Now everything is too big to be a choking hazard or tethered to the table.
Digital Entertainment Done Right
And honestly? Screens aren’t the enemy if you use them strategically. The American Academy of Pediatrics says high-quality educational content is fine for kids 2+ in waiting scenarios. The key is intentionality.
We mounted a 32-inch TV at 40 inches from the floor (eye level for seated kids) in our school-age area. It plays PBS Kids content on a loop with closed captions. Volume is set low enough that it doesn’t dominate the space. The whole setup—TV, wall mount, and Roku—costs about $250.
What NOT to do: Don’t put unsecured tablets in the waiting room. They walk away. We tried it for three months and lost two iPads despite having them “tethered.” If you want tablets, use mounted or locked kiosk systems designed for public spaces.
Projection games are the next-level option if you have the budget. Interactive floor projections ($1,500-3,000) let kids “pop” bubbles or “step on” fish. They’re wildly engaging, easy to clean (it’s just the floor), and accommodate multiple kids at once. I’m saving up for one because I’ve seen them work magic in hospital waiting rooms.
What NOT to Put in Your Waiting Room
Let me save you some painful lessons:
❌ Stuffed animals: Impossible to disinfect, harbor allergens, and get grimy fast
❌ Play kitchens with small accessories: Pieces disappear within 48 hours
❌ Toys with batteries or sound: They break constantly, and the noise drives everyone insane
❌ Water tables or sand tables: Fun in theory, nightmare in practice (spills, wet clothes, sand everywhere)
❌ Anything with fabric or rope: Infection control nightmare
Stick with hard plastic, wood, or metal toys that can be wiped down with disinfectant wipes. If it can’t survive a Clorox wipe, it doesn’t belong in a medical waiting room.
Creating a Sensory-Calm Zone

About 1 in 6 kids has sensory processing challenges, according to recent CDC data. That means in a waiting room with 20 kids, 3-4 of them are actively overwhelmed by stimuli that most of us don’t even notice. A sensory-calm zone isn’t a nice-to-have anymore—it’s essential.
We carved out a 6×6-foot corner with a floor-to-ceiling fabric divider. Inside: a bean bag chair, noise-canceling headphones on a hook, a weighted lap pad, and a dimmer switch for the overhead light. The whole setup cost $180 and has become the most-used square footage in our entire waiting room.
Visual clutter is the sneaky culprit in sensory overload. We removed 40% of our wall decorations and immediately got feedback that the space felt “calmer.” Less is genuinely more for neurodivergent kids.
Designing for Neurodivergent Children (Autism, ADHD, SPD)
Here’s what evidence-based design for autism and ADHD actually looks like in practice:
Predictability: Visual schedules showing wait time (“You are #3 in line”), clear signage for bathrooms and exits
Reduced auditory input: Acoustic ceiling tiles ($120 for a 10×10 area), carpeted floors, volume limits on TVs
Tactile options: Fidget toys in a basket (washable options like Tangle Therapy), textured wall panels
Escape routes: Clear sightlines to exits so kids don’t feel trapped
We added a simple visual timer near the reception desk. Parents of kids with ADHD tell us it’s a game-changer—their kids can see how much longer they’ll wait instead of asking every 90 seconds.
Accessibility Beyond ADA Minimums
ADA compliance covers wheelchair access, but it misses a lot. We added features that go beyond code requirements and make a real difference for kids with various disabilities.
For kids with visual impairments, we added high-contrast edge strips on stairs and textured pathways (different flooring materials) leading to key areas. For kids with hearing impairments, we installed a visual paging system (digital display shows names instead of just calling them over the intercom).
Picture communication boards near the reception desk help non-verbal kids and kids with speech delays. We printed a free board from BoardMaker Online and laminated it. Kids can point to “bathroom,” “water,” “toy,” or “parent” to communicate needs.
Trauma-Informed Waiting Room Design
This is something I learned about only recently, and it changed how I think about space entirely. Trauma-informed design creates environments that feel safe for kids who’ve experienced medical trauma, abuse, or other adverse childhood experiences.
Key principles: Give families choices (multiple seating areas, not one prescribed spot), maintain clear sightlines (no blind corners or hidden areas where kids feel trapped), use warm materials and lighting (avoiding institutional coldness), and provide control where possible (adjustable lighting, choice of activities).
We rearranged our seating so no family has their back to the entrance. It sounds small, but parents with trauma histories have specifically mentioned feeling more comfortable with this layout.
Post-COVID Cleaning Protocols for Pediatric Waiting Rooms
Infection control is now the first thing parents evaluate. I’ve watched moms do the “finger test” on our play table before letting their kid touch it. Your cleaning protocol needs to be visible, documented, and rigorous.
Here’s the CDC-aligned schedule we follow:
| Frequency | What to Clean | Product |
|---|---|---|
| After each patient interaction | High-touch surfaces (door handles, check-in counter, pens) | Clorox Healthcare wipes |
| Every 2 hours during operating hours | Toys, activity panels, and table surfaces | Lysol IC disinfectant |
| Daily (end of day) | All seating, floors, light switches, and bathroom | Broad-spectrum hospital-grade cleaner |
| Weekly | Windows, walls, and a deep clean of all zones | Professional cleaning service |
We keep the disinfectant wipes and schedule visible at the reception desk. Parents see us wiping down between families. That transparency matters.
Choosing Antimicrobial Materials & Touchless Solutions
Materials make or break your infection control efforts. We replaced all our porous surfaces (fabric chairs with visible seams, wood with cracks) with antimicrobial-treated vinyl and solid-surface plastics. It costs about 30% more upfront but pays for itself in reduced cleaning labor and longer product life.
Touchless solutions are the upgrade everyone notices. We installed motion-sensor hand sanitizer dispensers near the entrance ($40 each on Amazon), touchless faucets in the bathroom (professional install, about $250 per sink), and a touchless check-in kiosk ($1,200 but worth every penny—reduces front desk contact by 60%).
The check-in kiosk was controversial with my husband (“That’s so impersonal!”) until we saw the data. Parents prefer it. They feel more in control, wait time perception drops, and our front desk staff can focus on complex issues instead of routine check-ins.
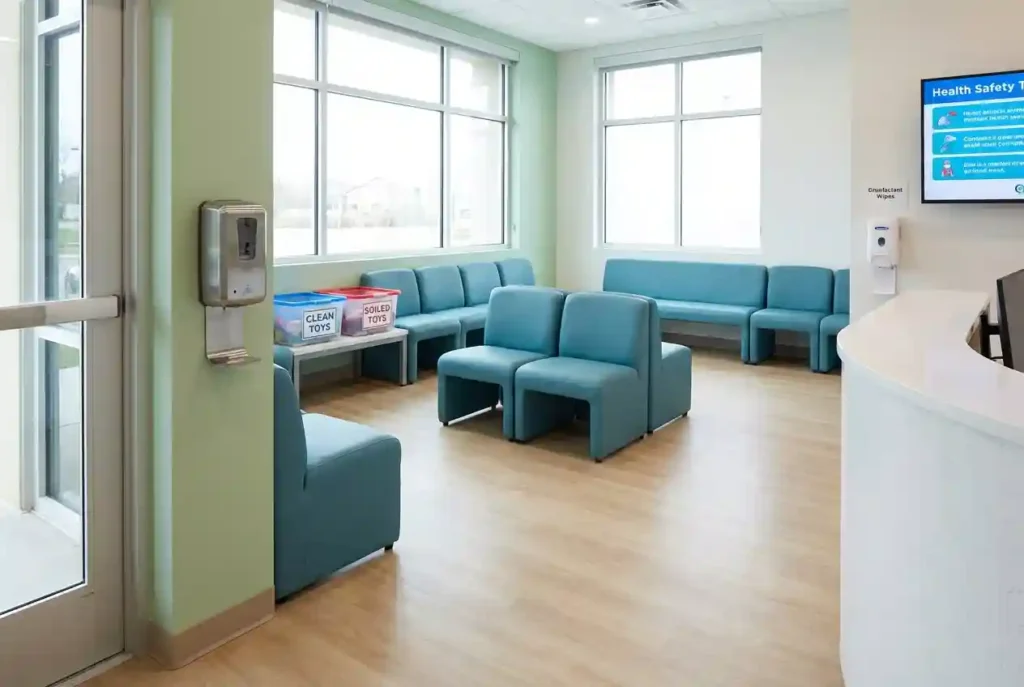
Toy Rotation & Quarantine Systems
Here’s the system that finally solved our toy hygiene headaches: two bins—clean and soiled. When a toy is played with, it goes in the “soiled” bin at the end of the day. We disinfect soiled toys overnight and rotate them back to “clean” the next morning. Never put a toy back in circulation until it’s been cleaned.
For high-touch items like bead mazes and activity panels, we wipe them down with disinfectant every two hours. We literally set a timer. It’s annoying, but it works.
We removed any toy that couldn’t survive daily disinfection. If it has batteries, fabric, or can’t be fully submerged or wiped down, it doesn’t belong in a medical waiting room anymore.
Flooring Safety
Flooring is overlooked until someone slips. We replaced our old vinyl tile (which got slippery when wet) with commercial-grade luxury vinyl planks with an R10 slip-resistance rating. It costs about $4 per square foot installed and has a textured grip even when damp.
Avoid area rugs if possible—they’re germ magnets and tripping hazards. If you must have rugs (we have one in the infant area for cushioning), get commercial-grade washable mats that can go through industrial laundry weekly.
Seamless transitions between flooring types prevent trips. We used transition strips at every threshold, and our insurance agent literally thanked us during the annual safety inspection.
Charging Stations & Free Wi-Fi
Dead phone = stressed parent. We installed four wall-mounted USB charging stations ($25 each on Amazon) near seating areas, and they’re used constantly. Parents plug in while they wait, and it gives them something to do besides watch the clock.
Free Wi-Fi is non-negotiable now. Display the network name and password prominently. We printed ours on a laminated card at each seating cluster and on a wall sign near the entrance. Small thing, huge impact on perceived hospitality.
Wireless charging tables are the next-level option. We upgraded one side table to a built-in wireless charger ($180 from Wayfair), and it’s become the most fought-over seat in the room. Parents with newer phones love it.
Digital Queue Displays & Wait Time Transparency
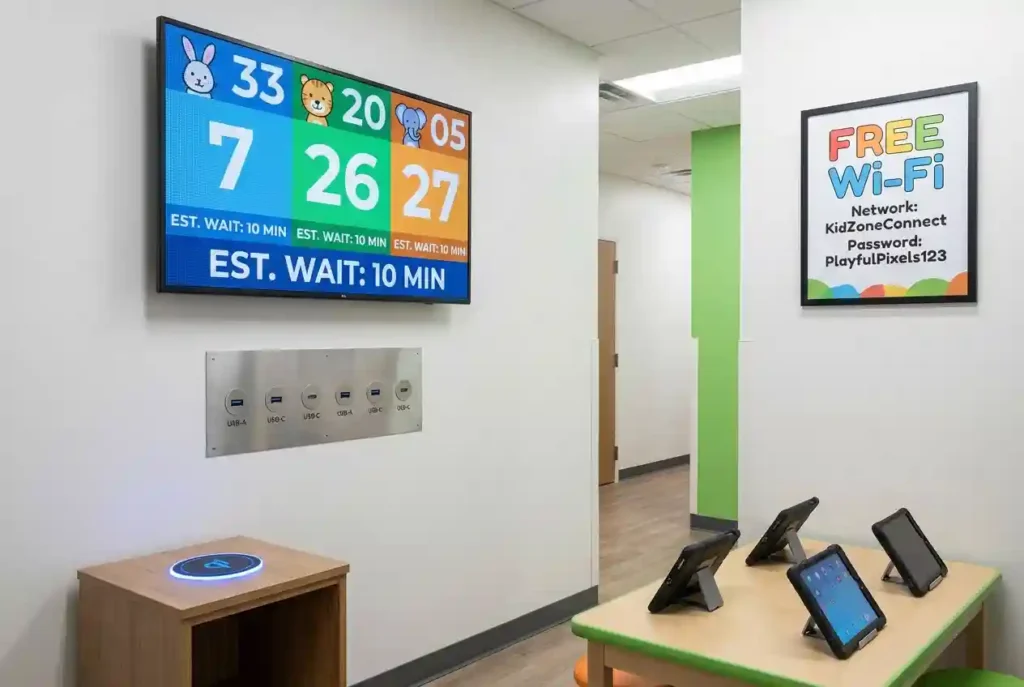
Nobody likes wondering when they’ll be called. We added a digital display board ($350 from Amazon) that shows the current queue position and approximate wait time. It syncs with our practice management software and updates automatically.
The psychological impact is enormous. Parents don’t ask “How much longer?” every five minutes. Kids can see their name move up the list. Complaints about wait times dropped even though our actual wait time didn’t change—we just made it visible.
Refreshments & Snack Stations
This one’s controversial because of allergy concerns and mess potential. We compromised with a small beverage station: bottled water (free), a Keurig for parents ($100), and individually wrapped crackers in a basket. No peanuts, no common allergens, nothing messy.
Some practices skip this entirely due to liability concerns. If you go this route, post clear signage: “Parents are responsible for monitoring their child’s food allergies and consumption.” Check with your malpractice insurer first.
Mother & Infant Rooms
A dedicated nursing room is one of the most-requested amenities in parent surveys. We converted a 6×8-foot storage closet into a private nursing room with a comfortable chair, side table, outlet, and door lock. Total investment: about $400. Usage: daily.
If you don’t have space for a dedicated room, designate one corner of your waiting room as a nursing-friendly area with a privacy screen or curtain. It’s not perfect, but it’s better than nothing.
Child-Friendly Navigation
Kids can’t read complex directional signs, but they can follow colors and pictures. We color-coded our space: blue signs for bathrooms, green for the play area, and orange for the check-in desk. Each area has a matching floor decal with a fun icon (duck for bathroom, toy block for play area).
The result? Four-year-olds can navigate our waiting room independently, which makes parents’ lives easier and gives kids a sense of autonomy. We got the vinyl floor decals custom-made on Etsy for $60 total.
Floor graphics work better than wall signs for kids under 6. They naturally look down while walking. We added footprint decals leading from the entrance to the check-in desk. Kids follow them like a game.
Signage Accessibility
Don’t forget that signage needs to work for everyone. We added bilingual signs (English/Spanish) since 30% of our patient base is Spanish-speaking. Large-print signs benefit elderly grandparents who bring kids to appointments. Pictograms help families with limited English proficiency and kids who can’t read yet.
Our bathroom signs now feature both words and universal symbols at heights visible to kids (36 inches) and adults (60 inches). Simple change, but we eliminated the “where’s the bathroom?” question almost entirely.
Pediatric Waiting Room Ideas by Practice Type
Different practices serve different needs. A pediatric dentist’s waiting room shouldn’t look identical to a pediatrician’s office—the anxiety triggers are different, the visit purposes are different, and the design should reflect that.
Pediatrician’s Office
General pediatrics needs maximum flexibility since you’re serving newborns through teenagers. The age-zone layout I covered earlier is essential here. Focus on sick/well separation, comfortable parent seating (visits can be long with multiple kids), and a variety of activities for different ages.
Special consideration: Add a scale and height chart as interactive elements. Kids love measuring themselves. Make it a fun growth-tracking station with colorful markers showing average heights for different ages.
Pediatric Dentist
Dental anxiety is real and starts young. Your waiting room needs to counteract fear before kids even see the dentist. We’ve visited a dozen pediatric dental offices for research, and the best ones use ocean or jungle themes (calming, engaging) and prominently display photos of smiling kids in the dental chair.
Specific additions that work: A treasure chest with small toys kids can “earn” after their appointment (visible from the waiting room), educational posters about teeth that are fun rather than scary, and absolutely zero medical equipment visible from the waiting area. One office we saw had a video loop of other kids getting their teeth cleaned happily—genius social proof that normalized the experience.
Children’s Hospital / Emergency Department
Hospital waiting rooms have unique challenges: longer wait times, higher anxiety, and often kids in acute distress. Prioritize quiet zones, privacy dividers between families, and activities that work for a wide age range, since siblings often tag along.
Critical addition: A family consultation room separate from the main waiting area, where doctors can deliver serious news privately. This protects other families from overhearing traumatic conversations.
Pediatric Therapy Clinics (OT, PT, Speech)
Therapy waiting rooms need to balance engagement with calm. Many kids coming for therapy have sensory sensitivities or developmental delays, so the sensory-friendly design I detailed earlier is non-negotiable here. Include a visible schedule or “what happens next” board since predictability reduces anxiety for neurodivergent kids.
Special consideration: Transparent glass panels between the waiting room and therapy areas let parents observe sessions without being intrusive. Kids perform better when parents aren’t in the room, but parents need the reassurance of visibility.
Pediatric Urgent Care
Urgent care means scared kids and stressed parents. Speed and efficiency matter here more than elaborate play setups. Focus on clear triage signage, fast check-in systems, and comfort over entertainment. Soft lighting and warm colors counteract the “emergency” stress response.
Specific addition: A small “distraction station” near the triage area with simple fidget tools and stress balls helps kids (and parents) regulate while waiting for intake.
Budget Guide, What a Pediatric Waiting Room Redesign Actually Costs
This is the section nobody else will give you straight answers on. I’m breaking down real numbers from our redesigns and from practice owners I’ve interviewed.
Budget-Friendly Refresh ($500–$2,000)
Perfect for: Small practices, tight budgets, or testing changes before committing to a full renovation.
What you can accomplish:
- Fresh paint (2-3 accent walls): $100-200 in materials if you DIY
- Wall decals or simple mural: $80-300, depending on size
- 3-5 new toys (mix of wall-mounted and table activities): $100-250
- IKEA or budget furniture refresh (1 kids’ table, 4 chairs): $60-150
- Reading corner setup (bookshelf, cushion, 15-20 books): $80-150
- Basic LED lighting upgrade: $60-120
- Deep cleaning and decluttering: $100-200 (or free if you do it)
Total: $580-$1,570
Biggest bang for your buck: Paint and decluttering. My neighbor Linda runs a family practice and spent $350 on paint and reorganization. Her Google reviews immediately mentioned how “fresh and clean” the space looked.
Mid-Range Makeover ($2,000–$10,000)
Perfect for: Established practices ready to invest in patient experience, or addressing specific pain points like infection control or accessibility.
What you can accomplish:
- Professional interior consultation: $300-800
- Commercial-grade furniture package (seating, kids’ table, storage): $1,200-3,000
- Wall-mounted activity panel set (3-5 quality pieces): $300-800
- Full lighting renovation (LED panels, dimmers, natural light enhancement): $600-1,500
- Flooring upgrade (luxury vinyl, 300 sq ft): $1,200-2,000 installed
- Sick/well separation divider system: $400-1,200
- Technology additions (digital queue display, 1-2 charging stations): $400-700
- Professional custom mural or comprehensive decal package: $500-2,000
- Sensory-calm zone setup: $200-600
Total: $5,100-$12,600 (adjust based on priorities)
This is where we landed. We spent $7,800 over six months and saw measurable results—our average Google rating jumped from 4.1 to 4.6 stars.
Premium Transformation ($10,000–$50,000+)
Perfect for: High-volume practices, competitive markets, new construction, or practices with significant square footage.
What you can accomplish:
- Full interior design service (planning through execution): $3,000-10,000
- Complete furniture package (all zones, commercial-grade, antimicrobial): $4,000-12,000
- Interactive technology (floor projection games, multiple screens, touchless check-in kiosk): $2,500-8,000
- Architectural changes (built-in dividers, new reception desk, structural modifications): $5,000-20,000
- Custom millwork and storage solutions: $2,000-8,000
- Premium flooring throughout: $3,000-8,000
- Professional lighting design with smart controls: $1,500-5,000
- Comprehensive signage and wayfinding system: $800-3,000
- Mother/infant room buildout: $2,000-6,000
Total: $23,800-$80,000 (wide range based on scope)
Tax Deductions & Financing Options
Here’s what nobody told me until my accountant mentioned it casually: waiting room improvements qualify as business expenses under Section 179. You can deduct up to $1 million in qualifying property in the year you place it in service (2026 limits). That includes furniture, technology, and even some renovation costs.
Check with your CPA, but in many cases, you can write off 100% of your waiting room redesign in year one. That $7,800 mid-range makeover effectively cost us $5,460 after tax deductions (assuming 30% effective tax rate).
Some medical equipment vendors offer healthcare practice financing at 0-5% APR for 24-36 months. We financed half of our furniture package through a vendor program and paid it off over 24 months at 2.9% interest.
Implementation. Your Step-by-Step Action Plan
Step 1. Assess Your Current Space
Walk through your waiting room as you’ve never seen it before. Better yet, ask a friend to do a “first impression” walkthrough and report back. Take photos from the entrance—you’ll be shocked at what the camera reveals that your brain filters out.
Download my free waiting room audit checklist (covers the 47 most critical elements from furniture condition to infection control protocols). Score each category honestly. This becomes your baseline and your roadmap.
Step 2. Gather Patient & Staff Feedback
Real talk: you can’t design in a vacuum. We put out a 5-question anonymous survey for parents (took them 90 seconds to complete) and got 83 responses in two weeks. The #1 complaint? Uncomfortable adult seating. I had been focused on kid furniture and completely missed the parent experience.
Staff feedback is equally critical. Your front desk team knows which areas get the most complaints, which toys break constantly, and which design elements create workflow bottlenecks. We discovered our toy bin placement was blocking the path to the bathroom during busy periods. a simple fix once someone pointed it out.
Step 3. Prioritize Changes by Impact & Budget
List every improvement you want to make. Then rank each by two factors: cost and impact. Focus first on high-impact, low-cost changes (paint, decluttering, lighting). These give you immediate wins and build momentum for bigger projects.
We made a simple matrix: Immediate (under $200), Short-term (under $2,000), Long-term ($2,000+). We tackled one item from each category every quarter, which felt manageable and kept the space evolving without overwhelming our budget.
Step 4. DIY vs. Hiring a Professional Designer
DIY makes sense for: painting, wall decals, furniture shopping, toy selection, minor décor updates, and organization systems. You’ll save 60-80% on labor costs.
Hire a professional for: space planning in oddly-shaped rooms, ADA compliance questions, electrical work, flooring installation, architectural changes, and comprehensive color/material selections if you’re overwhelmed by choices. A designer’s consultation ($300-800) can save you thousands in costly mistakes.
We DIY’d about 70% of our project and hired help for lighting installation and flooring. Best decision we made.
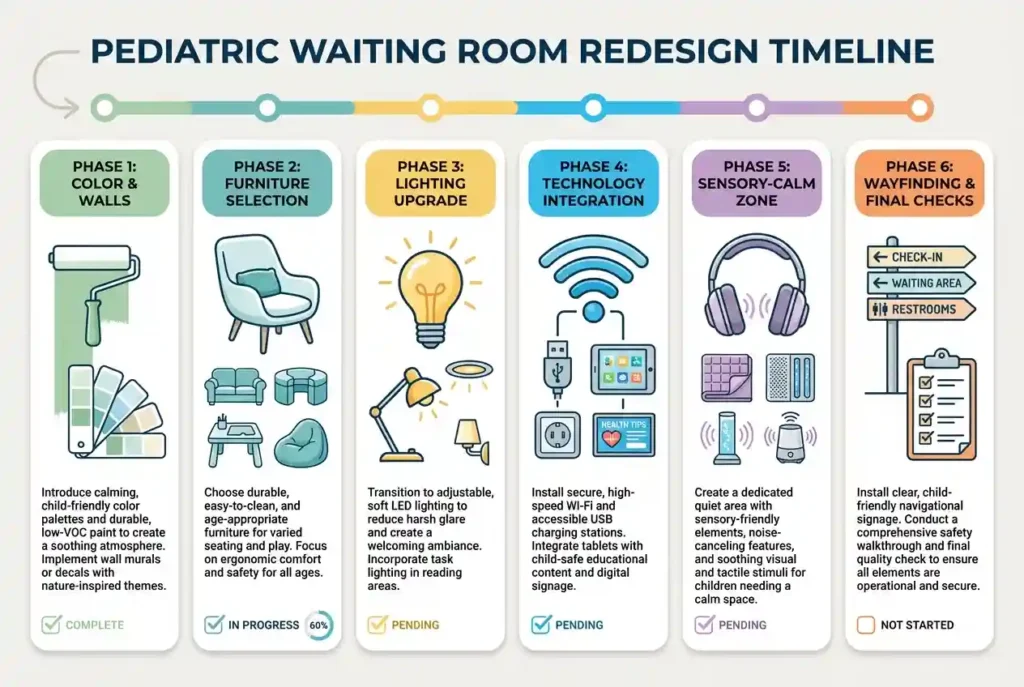
Step 5. Phased Rollout Strategy
Don’t shut down your waiting room for a week-long renovation. Phase your work over 3-6 months, tackling one zone or category at a time. This minimizes disruption and lets you test changes before committing fully.
Our phases: Month 1 (paint & declutter), Month 2 (new furniture), Month 3 (lighting upgrade), Month 4 (technology additions), Month 5 (sensory zone), Month 6 (final touches & signage). Each phase took 1-2 days to implement with minimal patient impact.
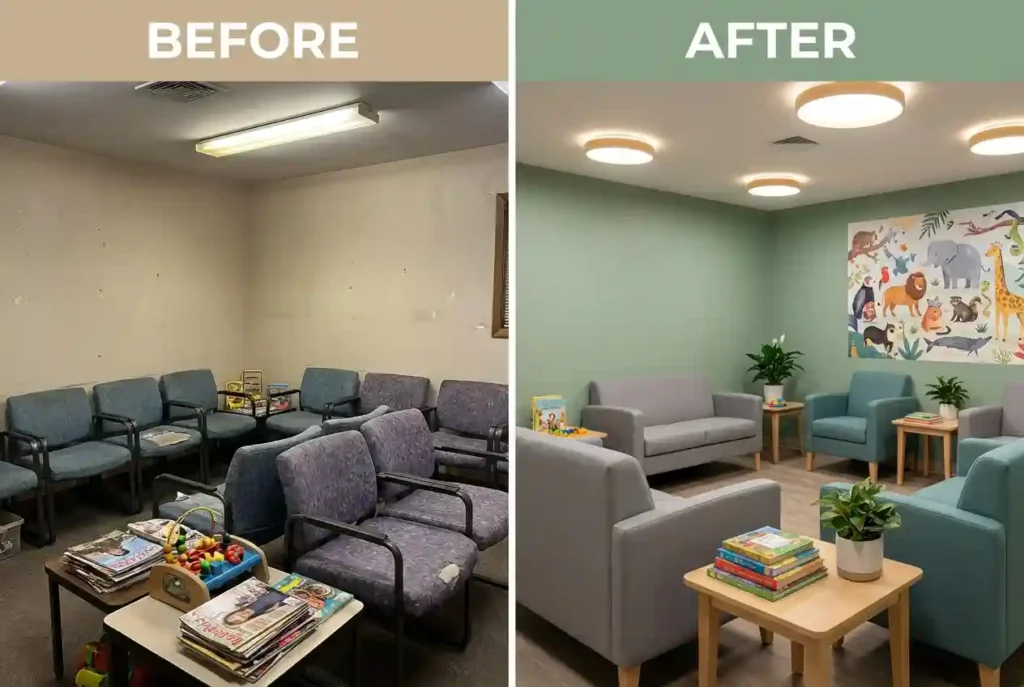
Before & After: Small Practice, Big Impact
Dr. Martinez runs a solo pediatric practice in suburban Ohio with a cramped 240-square-foot waiting room. Her Google reviews consistently mentioned “dated décor” and “uncomfortable seating.” She had a $3,000 budget and six weeks to make a difference.
What she changed: Repainted from beige to soft sage green ($180 DIY), replaced five 1990s-era chairs with two loveseats and modular seating ($950), added three wall-mounted activity panels ($270), installed LED lighting with dimmers ($220), created a mini reading nook in an awkward corner ($120), and deep-cleaned everything ($150 professional service).
Total investment: $2,890
Results after 4 months: Average Google rating increased from 3.9 to 4.5 stars. Six reviews specifically mentioned the “beautiful new waiting room.” Patient no-show rate decreased by 18% (Dr. Martinez theorizes parents feel better about bringing kids to a practice that clearly invests in their experience).
How Riverside Pediatrics Reduced Complaints by 64%
Riverside Pediatrics in Austin had a recurring problem: parent complaints about wait times, even though their actual wait time was below the national average at 14 minutes. The issue wasn’t the wait—it was the experience of waiting.
Their solution: They focused entirely on transparency and engagement rather than physical renovations. Added a digital queue board showing estimated wait times ($420), installed four USB charging stations ($100), improved Wi-Fi and posted the password prominently ($0—they already had it), added a “currently being seen” display showing how many patients were ahead in queue, and trained front desk staff to proactively update families on delays.
Total investment: $520 plus staff training time
Results: Complaints about wait times dropped 64% in the first quarter. Average wait time stayed the same, but patient satisfaction scores jumped. This taught me that perception matters as much as reality.
Award-Winning Design: Children’s Clinic of Portland
This 3,500-square-foot waiting room won a 2025 Healthcare Design Award. What made it special wasn’t a massive budget—it was thoughtful, evidence-based design executed beautifully.
Key elements: Biophilic design with floor-to-ceiling windows, living plant wall ($4,000), three distinct age zones with clear visual boundaries using color and flooring changes, interactive floor projection game in the toddler zone ($2,800), completely separate sick/well waiting areas with independent HVAC systems, sensory-calm pod with adjustable lighting and noise-canceling features, and trauma-informed design principles throughout (no blind corners, multiple seating choices, clear exit visibility).
What I learned visiting this space: You don’t need every expensive feature to create an exceptional experience. But the features you do include should be deeply intentional and backed by research, not just aesthetic preference.
Frequently Asked Questions
How do you decorate a pediatric waiting room on a tight budget?
Start with paint and decluttering—the two changes that deliver the biggest visual impact for under $200. Add wall decals from Amazon or Etsy ($50-150), hit up thrift stores for gently used kids’ books and storage bins, and rearrange existing furniture to create defined zones. Skip expensive custom murals initially; focus on making your space clean, organized, and colorful with smart use of what you already have.
Should pediatric waiting rooms have separate areas for sick and well children?
Yes, ideally. Post-COVID, parents expect some level of separation. If you can’t create two fully separate rooms, use physical dividers like floor-to-ceiling panels ($200-600), schedule sick visits during dedicated time blocks, or offer outdoor waiting options where families wait in their car until texted. Even a clear “Well Child Area” sign with a HEPA air purifier gives parents peace of mind.
What are the best wall-mounted toys for infection control?
Bead mazes, activity panels, magnetic drawing boards, and sensory wall tiles top the list. They can’t be thrown or removed, they’re easy to wipe down between uses, and they entertain kids for 10-15 minutes. Avoid anything with fabric, batteries, or small detachable pieces that create cleaning nightmares or choking hazards.
How often should waiting room toys be cleaned, and what products work best?
High-touch wall toys should be wiped down every 2 hours with Clorox Healthcare wipes or Lysol IC disinfectant. Tabletop toys go into a “soiled” bin after each use and get disinfected overnight before rotating back. Use EPA-registered hospital-grade disinfectants that kill common pediatric viruses and bacteria—check the CDC website for current recommendations.
What colors are best for reducing anxiety in pediatric waiting rooms?
Soft blues and greens have the strongest calming effect according to environmental psychology research, reducing cortisol by measurable amounts. Warm creams and pale yellows work well for infant areas (engaging without overstimulating). Avoid stark white (feels clinical) and bright reds or oranges in high-anxiety areas (too activating for nervous kids). Aim for nature-inspired palettes that feel warm but not overwhelming.
Can you design a kid-friendly waiting room in a small space under 300 square feet?
Absolutely. Focus on vertical space with wall-mounted toys and tall storage that doesn’t eat floor area. Use multifunctional furniture (storage benches, nesting tables). Create one combined zone for ages 1-6 rather than trying to separate infants and older kids. The layout in my Space Planning section shows specific configurations that work in compact footprints.
What’s the biggest mistake practices make with pediatric waiting room design?
Trying to appeal to every age equally and ending up appealing to no one. Toddlers don’t care about teen magazines, and 12-year-olds won’t touch the Paw Patrol toys. Either create distinct age zones or accept that your design will skew toward your most common patient demographic (usually the 2-6 year range for general pediatrics). Commitment to a clear direction always beats trying to be everything to everyone.
Are tablets and iPads in waiting rooms a good idea or a liability risk?
Mounted, locked kiosk systems work well ($300-600 per unit with theft protection). Loose tablets, even tethered ones, disappear. We lost two iPads in three months before switching to wall-mounted tablets in protective cases. If you can’t afford kiosk systems, a wall-mounted TV with educational content is safer and more cost-effective.
How do you make a waiting room sensory-friendly for kids with autism or ADHD?
Create a dedicated calm zone with reduced visual clutter, dimmable lighting, noise-canceling headphones, and soft seating. Add visual schedules showing wait times and what happens next. Use acoustic panels to dampen noise ($120 for a 10×10 area). Provide fidget tools in a basket. Most importantly, offer choices—multiple seating areas, different activity types—so kids can self-regulate based on their sensory needs in the moment.
What questions should I ask when interviewing an interior designer for my pediatric waiting room?
Ask if they have specific healthcare or pediatric design experience, whether they’re familiar with ADA and infection control requirements, how they approach age-appropriate zoning, if they can provide references from other medical practices, what their typical project timeline looks like, and whether their fee includes material sourcing and vendor coordination. Request a detailed proposal showing how they’ll balance aesthetics with safety, hygiene, and budget constraints before signing anything.
Conclusion
After three years of continuous improvements, I’d start this journey all over again in a heartbeat. The biggest lesson wasn’t about paint colors or furniture—it was realizing that your waiting room tells families whether you actually see their kids as people, not just patients. Start with one small change this week, measure the response, and build from there.