
Base Cabinets Guide, Real Tips from a DIY Kitchen Makeover
It was one of those Sunday afternoons when I should have been folding laundry or prepping lunches for the week. Instead, I was hunched over in my kitchen, drill in hand, trying to install a drawer base cabinet I’d bought on sale (it was $149, and I was irrationally proud of that deal). My toddler had just fallen asleep with a graham cracker in his fist, and I figured I had about 40 minutes before he woke up screaming for juice.
Anyway. I measured once, maybe twice (but let’s be real, probably not correctly), and I somehow convinced myself that drawer slides were “intuitive.” They’re not. Ten minutes later, I had a drawer that opened like it had stage fright, halfway, then jammed. I called my neighbor Linda. She showed up with a level and a look that said, “Bless your heart.”
And that was my initiation into the wild world of base cabinets.
Here’s the thing nobody tells you: base cabinets seem boring, like just another box. But they quietly carry the weight of your entire kitchen. They hold your snacks, your pots and pans, your dreams of being that person who alphabetizes spices (I gave up at “oregano”). And when they’re installed right? Game. Changer.
If you’ve ever stood in a hardware aisle debating between plywood and MDF while texting your spouse, “which one’s cheaper?” you’re in the right place. This isn’t a contractor’s manual. It’s what I wish I’d known before my third Home Depot run that day.
So let’s talk base cabinets, the good, the bad, and the “what even is a toe kick?”
What Are Base Cabinets? (And Why They Matter More Than You Think)

You’d think a base cabinet is just a box on the floor. And technically, it is. But if you’ve ever tried to function in a kitchen without them, like I did during our cabinet swap-out week (a.k.a. the Dark Times), you’ll quickly realize they’re the workhorses of the whole space.
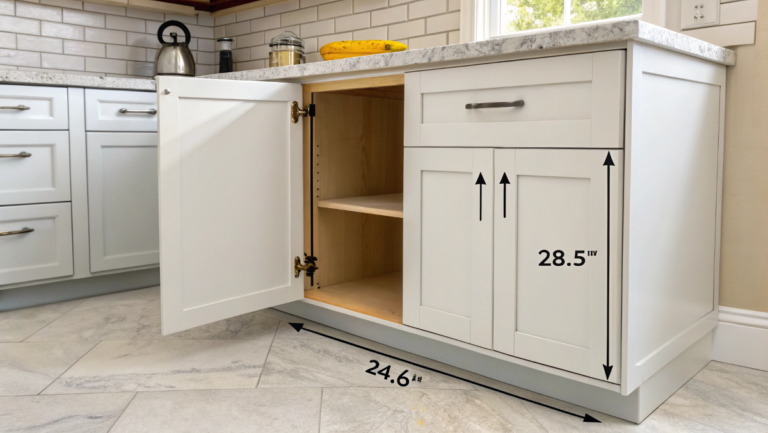
Base cabinets are the lower units in your kitchen, the ones that sit directly on the floor and support your countertop. They’re usually about 24 inches deep, 34.5 inches tall (before the countertop), and they come in widths ranging from 9 to 48 inches. That’s the boring definition. But here’s how I see them: they’re where I keep the pasta, the crockpot, the tangle of plastic lids I refuse to throw out because maybe one day I’ll find the matching container.
What makes them so important is how much they do without asking for credit. They hide trash bins. They hold heavy pans without complaining. They give us drawers to stuff full of batteries, scissors, and whatever mystery items our kids sneak in. (One time I found a Hot Wheels car wedged behind my mixing bowls. No clue how long it had been living there.)
In my case, I didn’t really understand the value of good base cabinets until I tried to organize without them. I had open space, and I thought I’d line up some bins and call it a day. That lasted… maybe 48 hours. Turns out, bins don’t have hinges. Or shelves. Or any charm.
If you’re renovating, designing, or just dreaming, base cabinets deserve a little love. They’re not just functional, they’re foundational. And once you start planning where each drawer and door will go, you start imagining how your whole kitchen could feel.
And honestly? That’s when the fun starts.
Common Sizes and Dimensions (Or: How I Learned to Measure Twice)
Okay, story time.
There was this one Saturday morning, I’d just had my second cup of coffee (feeling unstoppable), and I decided it was finally time to install the new base cabinet under our kitchen window. I measured the space. Felt good about it. Bought a 36-inch cabinet. Hauled it in. Got it halfway into place before realizing I hadn’t accounted for… the window trim. The edge was off by, no joke, a full inch. My husband walked in mid-wiggle and just said, “Want me to go get the smaller one?” Reader, I did not want him to go get the smaller one. I wanted to cry and throw a level at the wall. (I didn’t. But I thought about it.)
So here’s what I wish I had known before I got too confident:
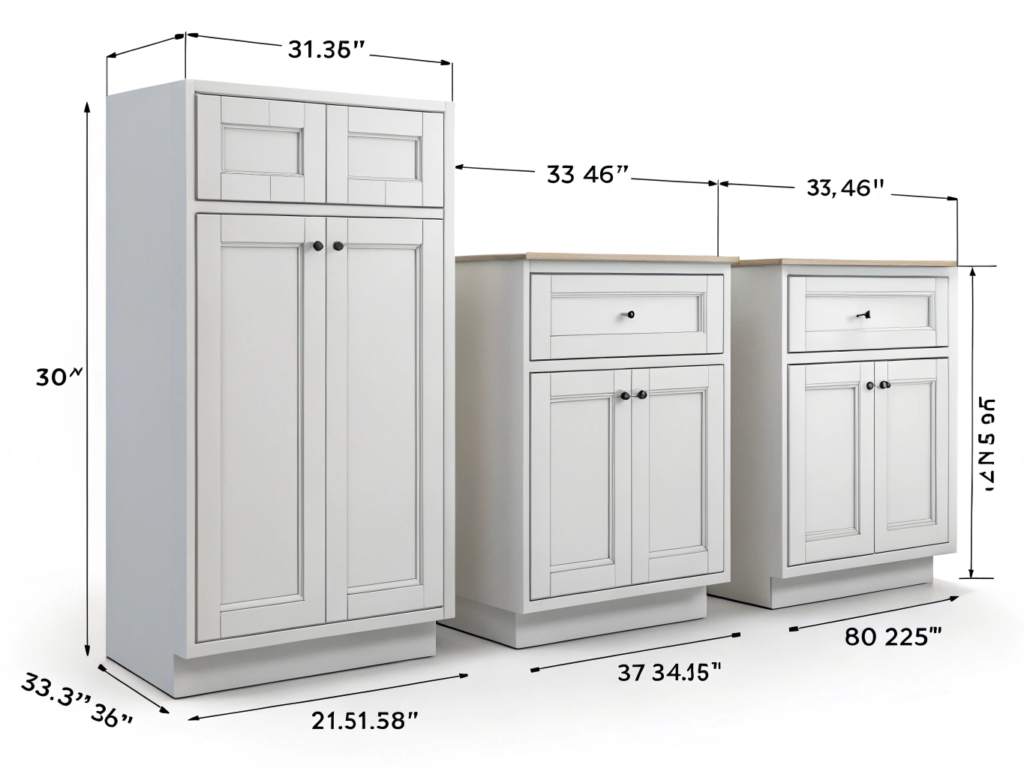
Standard Base Cabinet Sizes (That You Should Know Before Shopping)
-
Height: 34.5 inches (without the countertop)
-
Add a typical 1.5″ countertop and you’re at 36″ total height.
-
-
Depth: Standard is 24 inches
-
Some use 21″ for tighter spaces (like apartments or small kitchens).
-
-
Width: Ranges from 9″ to 48″ in 3″ increments
-
Common widths: 18″, 24″, 30″, and 36″
-
Drawer bases usually start at 12″ and go up
-
And then there’s toe kick height, that little recessed space at the bottom? Usually around 4.5″ tall and 3″ deep. It gives your feet room when you’re leaning over to stir soup or scrape off last night’s pasta sauce.
Maya’s “Measure Twice” Tips:
-
Measure with trim and wall bumps in mind; don’t assume the wall is flush.
-
Double-check for outlets or plumbing that might get in the way.
-
Bring a tape measure and notepad to the store (and maybe a backup tape measure, because mine always disappears).
-
Plan cabinet widths around appliances; your stove or dishwasher might dictate spacing more than you think.
If you’re working in a funky layout (which let’s be real, most kitchens are), it’s worth mocking things out with painter’s tape on the floor. I did that on my second attempt, and it saved me from cabinet Tetris 2.0.
Bottom line: cabinet dimensions matter, but the real skill is knowing how to work with your weird walls, wonky corners, and surprise trim. Trust me, future-you will thank you for slowing down with that measuring tape.
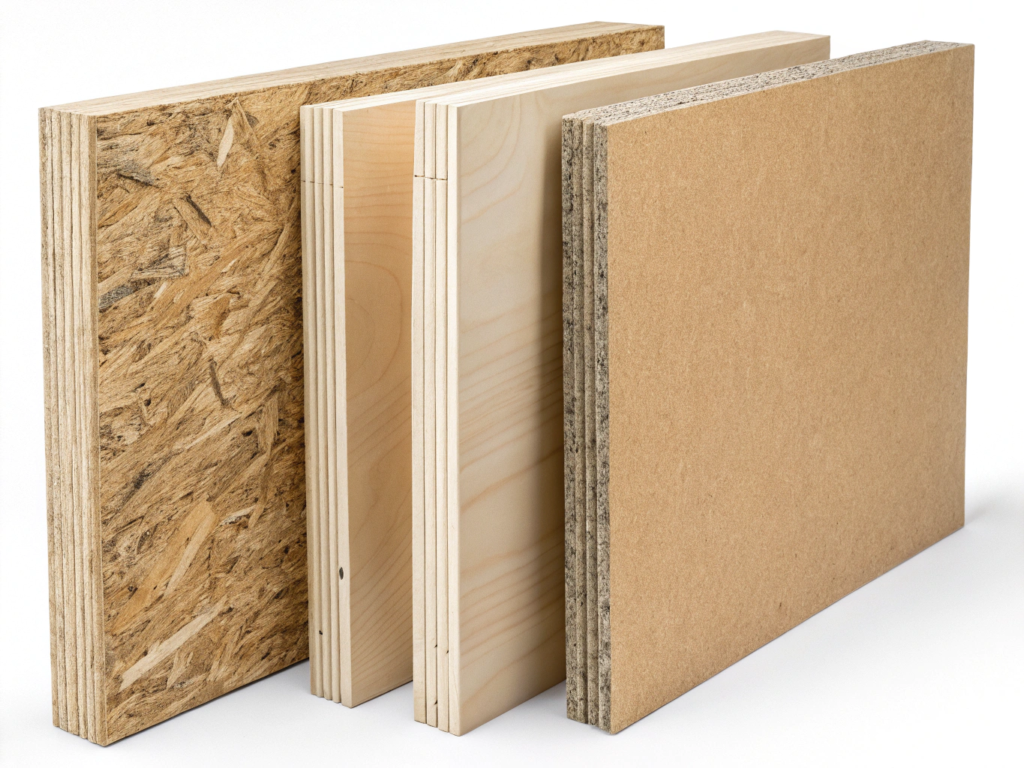
Material Matters: MDF vs. Plywood vs. Particleboard
I’ll be honest, I didn’t even know there were different cabinet materials the first time I shopped. I just looked for something that matched the other doors and didn’t cost more than a week’s worth of groceries. (Spoiler: I bought particleboard. Double spoiler: it didn’t love our summer humidity.)
Let’s break this down like a friend would, no jargon, no fluff. Just what you need to know before you swipe that credit card.
MDF (Medium-Density Fiberboard)
What it is: Wood fibers mixed with resin and compressed super tightly.
Pros:
-
Smooth surface = great for painted finishes
-
Doesn’t warp like real wood
-
Budget-friendly
Cons:
-
Not water-friendly (spills or leaks? Bad news.)
-
Heavy as heck
-
Chips if you’re not gentle during install
Maya’s take: I painted MDF once in July, and let’s just say… the finish bubbled like a pot of boiling pasta. It can work, but prep matters a lot.
Plywood
What it is: Thin sheets of wood veneer layered and glued together.
Pros:
-
Durable and holds screws well
-
Handles moisture better than MDF
-
Often used in higher-end cabinets
Cons:
-
Pricier than MDF or particleboard
-
Wood grain means paint doesn’t always go on smoothly
Maya’s take: If your kitchen sees a lot of action (kids, pets, you dropping pans at 7 a.m.), plywood is worth the upgrade. My current base cabinets are plywood, and three years in, they still look solid.
Particleboard
What it is: Wood chips + glue pressed into panels. Think: the bottom-shelf option.
Pros:
-
Super affordable
-
Often used in RTA (ready-to-assemble) cabinets
Cons:
-
Water is its worst enemy
-
Screws don’t hold well over time
-
Can sag or crumble under weight
Maya’s take: My under-sink cabinet used to be particleboard. Then my toddler spilled an entire sippy cup down the back and… well, let’s just say we upgraded. Cheap isn’t always cheerful.
So, What Should You Choose?
Here’s my totally non-expert but painfully earned advice:
-
Tight budget? Go for MDF, but seal it well and keep it dry.
-
Want it to last? Plywood’s your friend.
-
Just need something now? Particleboard can work, but be ready for a replacement down the line.
Also, check labels. Some brands mix materials. (I once found a cabinet that was plywood sides, particleboard back, and MDF doors. Like a Frankenstein of cabinetry.)
Types of Base Cabinets (From Sink Units to Drawers That Actually Work)
Here’s the moment I realized not all base cabinets are created equal: I tried to install a pull-out trash bin base. Easy, right? Except I mounted the rails backward, and the whole thing slammed shut like a haunted drawer. My toddler clapped. I cried a little inside. Good times.
Let me walk you through the types I wish someone had explained before I turned my kitchen into a cabinet graveyard.
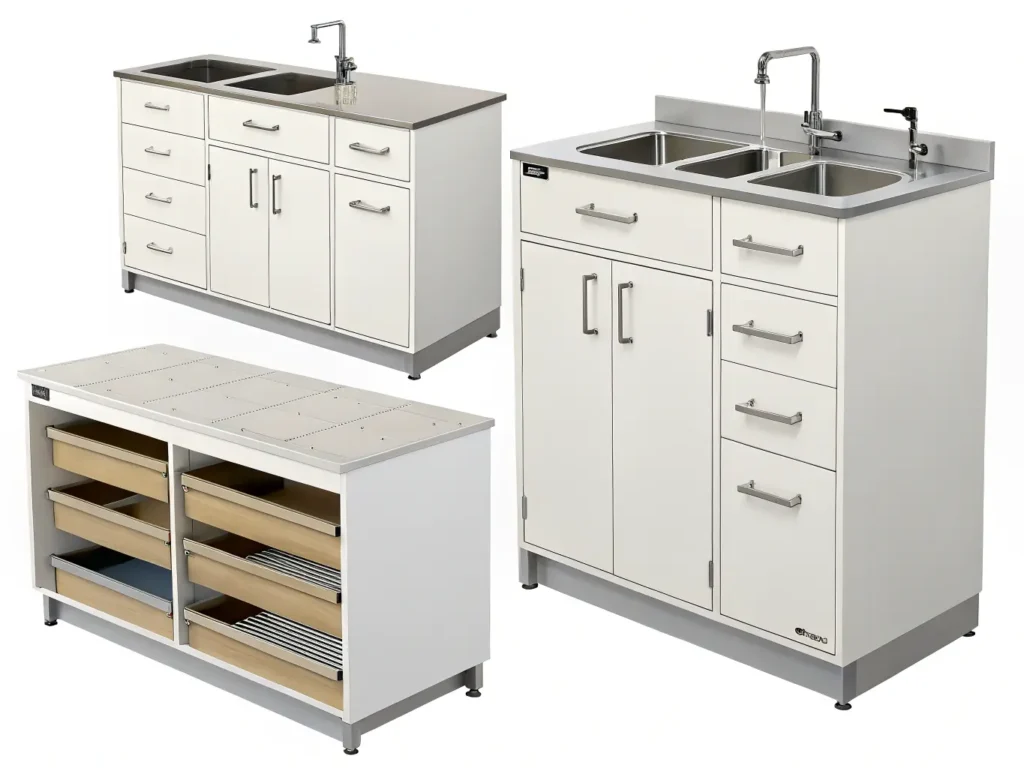
Sink Base Cabinets
-
No drawer on top, just a big open space with false fronts and cutouts for plumbing.
-
Usually 30″–36″ wide.
-
No shelf inside, but lots of potential for chaos (or clever storage).
Maya tip: Add a tension rod under your sink for hanging spray bottles. I did that last winter, and it felt like winning the organizational lottery.
Drawer Base Cabinets
-
Stack of drawers (usually 3 or 4)
-
Widths range from 12″ to 36″
-
Great for utensils, Tupperware, and your ever-expanding collection of takeout menus
Real talk: These are my favorites. No digging, no bending, no “where’s the lid?” panics. Just smooth sliding glory, if you install them correctly. (See: haunted drawer.)
Corner Base Cabinets (a.k.a. The Lazy Susan Zone)
-
Usually 36″ x 36″ L-shaped or pie-cut with a rotating tray
-
Great for pots, pans, and forgotten canned goods
Maya’s confession: I once installed a lazy Susan that didn’t clear the door. So every time I spun it, the door popped open like a jack-in-the-box. Learn from me: measure the swing space.
Pull-Out Base Cabinets
-
Narrow cabinets (12″–18″) that slide out vertically
-
Used for trash cans, spice racks, or cleaning supplies
Honestly? These feel luxurious even when they’re cheap. I found mine on sale for $87, and I’d buy it again in a heartbeat (even with the haunted drawer incident).
Open Shelf Base Units
-
No doors or drawers, just shelves
-
Trendy for display kitchens or island ends
Maya’s take: They look cute on Pinterest, but unless you love dusting or your kids don’t own ketchup, proceed with caution.
Each of these base cabinet types has a purpose, but the trick is figuring out your kitchen flow. Are you more of a “hide everything” person, or do you need fast access to every pan you own? Do your kids rummage? Do you need space for a compost bin?
Match the cabinet to the life you actually live, not the one you’re staging for Instagram.
Installation Real Talk Things I Wish I Knew Before Drilling
Okay, let’s rewind to the very first cabinet I ever tried to install solo. It was a stock base unit from Home Depot, on sale for $129, which should’ve been my first clue. I hauled it in myself, armed with a drill, some vague optimism, and zero shims. I was convinced the floor was level (spoiler: it wasn’t), and I ended up with a tilt so dramatic the drawer wouldn’t stay closed. My husband walked by, glanced at it, and said, “Looks like it’s reaching for help.”
So yeah—cabinet installation? Not just “putting it in place.” Here’s what I’ve learned after a few too many whoops moments.
The Tools You Need (Not Just What You Think You Need)
-
Drill (with a backup battery, mine always dies mid-project)
-
Level (preferably one longer than a ruler… ask me why)
-
Shims (these are non-negotiable, especially in older homes)
-
Tape measure (plus a pencil that mysteriously disappears every 10 minutes)
-
Clamps (I thought they were optional. They’re not.)
-
Stud finder (or the classic knock-and-guess method, which I do not recommend)
Optional but helpful:
-
Pry bar (for when your old cabinets do not want to leave quietly)
-
Shop vacuum (to clean up the sawdust you will definitely create)
-
A playlist with something upbeat, because this will take longer than you think
Installation Tips I Wish I’d Known Sooner
-
Start in the corner and work out, especially if you’re doing more than one base.
-
Always dry-fit first. I once mounted a drawer base without realizing the side panel hit a water shutoff valve. That was fun.
-
Don’t trust your floor. Use shims to level every single cabinet. (Yes, even that one that looks “pretty good.”)
-
Screw into studs. Drywall anchors are not your friend when there’s a 50-pound countertop on top.
-
Leave gaps intentionally — about 1/4″ from the wall, which you’ll cover later with filler strips or panels.
-
Label your parts if it’s a flat-pack kit. I skipped this once. It ended… poorly.
Maya’s Real-World Install Story: The “Don’t Be Like Me” Version
Last fall, I decided to replace our sink base cabinet solo while my kids were at grandma’s. I was feeling brave. I removed the old cabinet, cleaned the mess behind it (which included an ancient Cheerio), and then realized I couldn’t lift the new one high enough to slide over the plumbing. I ended up wedging it in sideways, scraping the wall, and knocking the faucet loose. My sink spat water like an angry hose for three full minutes while I screamed “NOPE NOPE NOPE.”
Moral of the story? Sometimes “doing it yourself” means learning the hard way. But also: double-check your plumbing layout before installing.
Base cabinet installation isn’t rocket science, but it’s definitely not plug-and-play. And if you’re anything like me, embracing the chaos (with a bit of humility) makes it all the more satisfying when it actually works.
How to Choose Base Cabinets That Fit Your Life
So here’s a thing I wish someone had said out loud when I started redoing my kitchen: your cabinets should fit your life, not your fantasy.
Because look, I had this grand plan once, matching drawer stacks, slide-out trays, a dedicated space for wine glasses I rarely use. It looked amazing on paper. But in real life? I have two kids, a husband who opens cabinets with his foot (don’t ask), and a dog who occasionally steals snacks from the bottom shelf.
Let’s talk real cabinet needs, based on real kitchen behavior.
Start With How You Use Your Kitchen
-
Cook daily? You’ll want deep drawers near the stove for pots, pans, and that one pan you use for everything.
-
Bake occasionally? A wider base drawer for mixing bowls and measuring cups can be a game-changer.
-
Got kids? Avoid low cabinets for anything fragile. I once found my toddler sitting inside a base cabinet with two spatulas and a look of wild joy.
-
Tiny kitchen? Narrow drawer bases and pull-out organizers = your best friends.
Think Function First, Pretty Second
I once helped my neighbor Linda install gorgeous glass-front base cabinets for her vintage casserole dishes. Two months later, she replaced them because the fingerprints drove her nuts. Beautiful? Yes. Functional? Not for a house with three teens and a golden retriever.
Some things to consider:
-
Trash pull-outs are lifesavers, but take up space. Make sure you can spare the width.
-
Corner cabinets look sleek in renderings but can be awkward in practice if you’re not doing a Lazy Susan.
-
Open shelves? Fun idea. But unless you like wiping down pasta dust every week… maybe not.
Budget Reality Check
Cabinet costs can snowball fast. Here’s how I broke mine down last time:
-
Drawer base: $189
-
Sink base: $129
-
Corner cabinet with Lazy Susan: $289
-
Pull-out spice rack (because yes, I caved): $112
Total? Around $719 before tax. And that was on a good sales week. So before you commit, ask: Which cabinets do I really use every day?
Maya’s Friendly Reminder
The “perfect” cabinet isn’t the one that looks best on a mood board. It’s the one that saves you ten minutes every morning because your Tupperware isn’t trying to escape. It’s the one your kids can’t destroy. It’s the one that holds your life together—quietly, without needing to be noticed.
So yeah, pick the cabinet that fits your life. Not just your layout.
Budget-Friendly Picks That Still Look Amazing
Let’s be real: I do not have a designer kitchen budget. I’ve got a “let’s hope there’s a good sale this weekend” budget. And yet, somehow, my base cabinets still manage to look like I planned it all (instead of what it really was: five different store trips, three impulse buys, and one full-blown meltdown over hinge choices).
Here’s how I made it work, and how you can, too.
Where I Shop (And What I Actually Paid)
-
Home Depot stock cabinets – I grabbed a 30” drawer base for $189. It wasn’t fancy, but the drawer glide? Smooth as butter.
-
Lowe’s – Found a sink base marked down from $169 to $119 because of a “box dent” (which had nothing to do with the cabinet itself).
-
Habitat for Humanity ReStore – Total score: a 36” Lazy Susan corner base for $65. Needed a little love, but structurally perfect.
-
Facebook Marketplace – Picked up two unused drawer units for $100 total. The seller said they didn’t match their new kitchen vibe. My vibe? “Cheap and functional.”
Budget-Friendly Cabinet Brands That Didn’t Let Me Down
-
Hampton Bay (Home Depot)
Great for quick installs. Durable enough for a chaotic family kitchen. -
Project Source (Lowe’s)
A little lighter on finish options, but reliable and surprisingly solid. -
IKEA SEKTION
If you’re okay with assembling it all yourself, and I mean all, you can save hundreds. Their drawer bases are especially smart with storage.
Ways I Saved Without Sacrificing Style
-
Swapped out factory hardware for $12 matte black pulls from Amazon.
-
Painted the doors using leftover cabinet enamel (color: “Bayberry Ice,” which sounds made up but is actually kind of perfect).
-
Skipped the toe kick trim on one side. Honestly? No one noticed but me.
True story: I once stood in a kitchen showroom and pointed at a sleek drawer stack, asking the price. “That section alone is $2,400,” the rep said. I smiled, nodded, and slowly backed away like it was a haunted house.
My Rule of Thumb?
Splurge where it matters (like drawers that don’t stick), and save where you can DIY (like paint or handles). A little elbow grease and a willingness to sand can make even the humblest base cabinet feel like a custom install.
Final Thoughts From Someone Who Has Screwed In A Lot of Hinges (Revised)
There’s something weirdly satisfying about hearing that final click when a cabinet door lines up just right. Of course, that only happens after three misaligned attempts, a few muttered words I can’t say here, and at least one emergency run to the hardware store because I ran out of screws (again).
But here’s what I’ve learned, hinge after hinge, drawer after drawer:
You don’t need a picture-perfect kitchen. You need a kitchen that feels like you, with fingerprints, nicks, and all. One where the cabinets actually close, the trash pull-out doesn’t fight you, and that awkward corner space finally works for something other than collecting dust bunnies.
I used to think base cabinets were just boxes you fill and forget. Now I see them as the quiet MVPs of the kitchen. They carry the daily chaos, snack runs, pasta pots, weird school crafts that need to be “flattened” overnight. And when you choose them intentionally, even on a tight budget, they give back a little calm in the middle of the storm.
So, if your drawer front is slightly crooked? That’s not a flaw, it’s a reminder that you built this. You figured it out. You made it yours.
And honestly? That’s way better than perfect.
FAQ, From Maya’s Toolbox to Yours
Q: What are the bottom cabinets called?
A: They’re called base cabinets. (Not “lower units,” not “under-sink thingies”, just plain ol’ base cabinets.) They’re the ones that sit on the floor and hold up your countertops. Basically, the kitchen MVPs.
Q: Is it cheaper to build base cabinets?
A: If you’ve got tools, time, and a pretty good grasp of math? Sure. It can be cheaper to DIY. But, and this is big, if you mess up even a little, you’ll end up spending more fixing it. I tried building a drawer box once, and let’s just say… It’s now holding paint cans in the garage.
Q: Why are IKEA cabinets so cheap?
A: Because you’re doing half the work. You get flat-packed pieces, and it’s up to you to assemble them like some high-stakes adult Lego set. IKEA cuts costs on shipping and labor, you save money, but invest in elbow grease. (Worth it if you don’t mind decoding diagrams that look like abstract art.)
Q: What is a base cabinet?
A: It’s the cabinet that sits on the floor and holds everything from pots to snacks to your sanity. It’s usually 24″ deep, 34.5″ tall (before the countertop), and comes in widths from 9″ to 48″. Not fancy. Just foundational.
Conclusion: One Cabinet at a Time
If someone had told me years ago that I’d one day have strong opinions about drawer glides and toe kicks, I would’ve laughed and gone back to burning grilled cheese in my old apartment kitchen. But now? I get it. Base cabinets aren’t just boxes; they’re the quiet backbone of your kitchen, doing the heavy lifting while you live your messy, beautiful life around them.
Whether you’re doing a full renovation or just swapping out one creaky cabinet, I hope this helped you feel a little less overwhelmed. And a little more ready.
You don’t have to get it perfect. You just have to start. One hinge, one drawer, one slightly off-center install at a time.
And hey, if your first drawer slides in sideways? Welcome to the club. You’re doing great.
Let me know if you try any of this, or if you’ve got a cabinet story that beats my haunted pull-out bin. (I doubt it, but I’m open to surprises.)